1. Activate Azure Right Management
** You can activate via portal or powershell
1.1 Activate via Portal
a) Login to
Office 365 Portal.
b) Go to
Admin, expand
Service Settings, click on
Rights Management.
c) Click on
Manage.
d) Click on Activate.
OR
1.2 Activate via Powershell
a) Download RMS module for powershell
here.
b) Install the RMS module for powershell. (required Microsoft Online Services Sign-in Assistant 2.1 or greater)
c) Run Windows PowerShell with administrator.
run command as below:
- $user = "<your Office 365 administrator
email">
- $cred = Get-Credential -Credential $user
- Connect-AadrmService -Credential $cred
2. Setup Azure Rights Management for Office 365 Message Encryption
** You can configure Automatic Protection or/and Manual Protection
Automatic Protection - If user send an email match the rule/policy pre-set by admin, rule/policy will automatic apply, and prevent IRM templates available in OWA and Microsoft Outlook.
Manual Protection - User can select which rule/policy when they send an email in OWA and Microsoft Outlook.
2.1 Automatic Protection
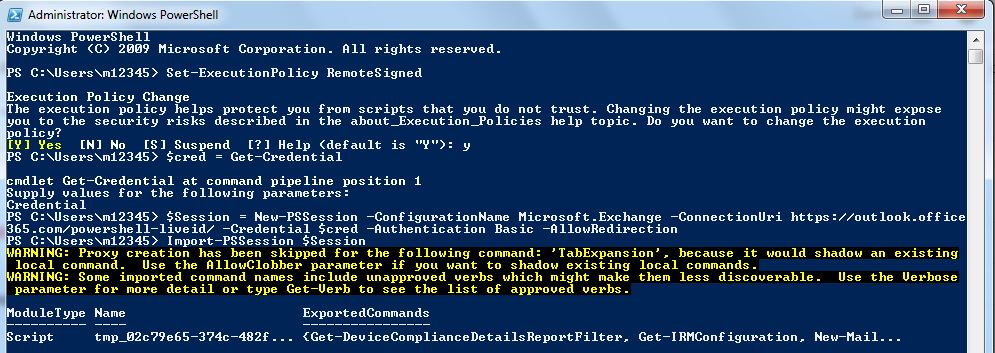
a) Connect to Exchange Online with Windows Power Shell (Run as Administrator) and import the session.
- Set-ExecutionPolicy RemoteSigned
- $Session =
New-PSSession -ConfigurationName Microsoft.Exchange -ConnectionUri
https://outlook.office365.com/powershell-liveid/ -Credential $cred -Authentication
Basic –AllowRedirection
- Import-PSSession
$Session
b) Configure the Rights Management Services (RMS) online key-sharing location in Exchange Online. Use the RMS key sharing URL corresponding to your location, as shown in this table:
Location RMS key sharing location
North America https://sp-rms.na.aadrm.com/TenantManagement/ServicePartner.svc
European Union https://sp-rms.eu.aadrm.com/TenantManagement/ServicePartner.svc
Asia https://sp-rms.ap.aadrm.com/TenantManagement/ServicePartner.svc
South America https://sp-rms.sa.aadrm.com/TenantManagement/ServicePartner.svc
Office 365 for Government (Government Community Cloud)
https://sp-rms.govus.aadrm.com/TenantManagement/ServicePartner.svc1
- Enable-OrganizationCustomization
- Set-IRMConfiguration -RMSOnlineKeySharingLocation https://sp-rms.ap.aadrm.com/TenantManagement/ServicePartner.svc
c) To import the Trusted Publishing Domain (TPD) from RMS Online
- Import-RMSTrustedPublishingDomain -RMSOnline -name "RMS Online"
d) To verify that you successfully configured IRM in Exchange Online to use the Azure Rights Management service.
- Test-IRMConfiguration –sender user@domain.com
e) Run the following commands to disable IRM templates from being available in OWA and Outlook and then enable IRM for your cloud-based email organization to use IRM for Office 365 Message Encryption.
Disable IRM templates from being available in OWA and Outlook
- Set-IRMConfiguration -ClientAccessServerEnabled $false
Enable IRM for your cloud-based email organization
- Set-IRMConfiguration -InternalLicensingEnabled $true
f) To view the IRM Configuration
- $true Get-IRMConfiguration
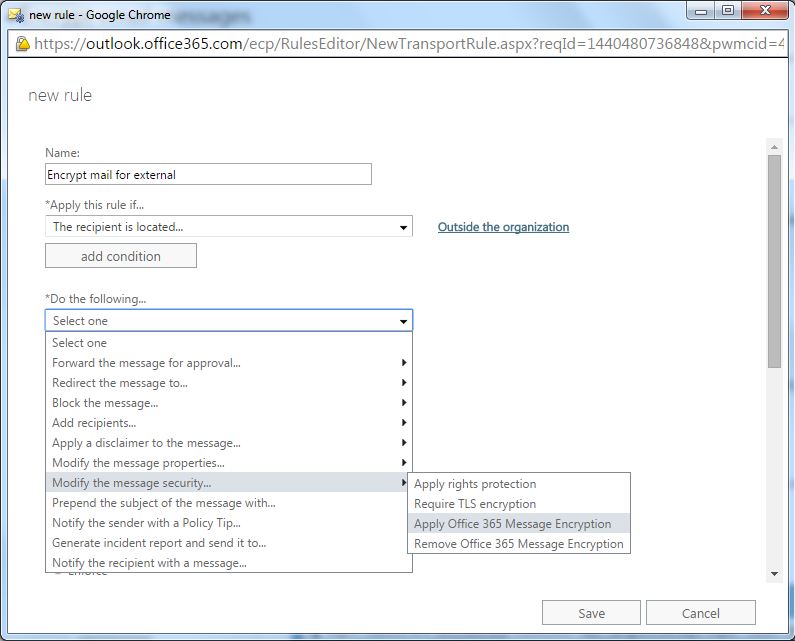
g) Define rules to encrypt or decrypt email messages
I) Go to Admin, expand Admin, click on Exchange.
II) Go to Mail Flow, rules, click on +, create a new rules..
III)

OR / AND
2.2 Manual Protection
a) Connect to Exchange Online with Windows Power Shell (Run as Administrator) and import the session.
- $Session = New-PSSession -ConfigurationName Microsoft.Exchange -ConnectionURI https://ps.outlook.com/powershell/ -Credential $Cred -authentication Basic –Allowredirection
- Import-PSSession $session
- Enable-OrganizationCustomization
- Set-IRMConfiguration -RMSOnlineKeySharingLocation https://sp-rms.ap.aadrm.com/TenantManagement/ServicePartner.svc\
(Depend your location)
Location RMS key sharing location
North America https://sp-rms.na.aadrm.com/TenantManagement/ServicePartner.svc
European Union https://sp-rms.eu.aadrm.com/TenantManagement/ServicePartner.svc
Asia https://sp-rms.ap.aadrm.com/TenantManagement/ServicePartner.svc
South America https://sp-rms.sa.aadrm.com/TenantManagement/ServicePartner.svc
Office 365 for Government (Government Community Cloud)
https://sp-rms.govus.aadrm.com/TenantManagement/ServicePartner.svc1
- Set-ExecutionPolicy RemoteSigned
- Import-RMSTrustedPublishingDomain –RMSOnline –Name “RMS Online”
b)
To verify that you successfully configured IRM in Exchange Online to use the Azure Rights Management service.
- Test-IRMConfiguration –sender user@domain.com
c) Enable IRM templates from being available in OWA and Outlook
- Set-IRMConfiguration -ClientAccessServerEnabled $true
d) Enable IRM for your cloud-based email organization
- Set-IRMConfiguration -InternalLicensingEnabled $true
Reference:


